IronSource Level Play
How to Create a BidMachine Account?
-
Create a BidMachine Account at https://bidmachine.io/#sign-up.
-
Upon registration, an activation email containing instructions will be sent to the email address you've provided. Please use the provided instructions to activate your account.
-
To enable BidMachine Ad Inventory through the IronSource Mediation platform, you must have an approved monetization account with BidMachine. Your account manager should provide you with the Source ID or use the guide. If you already have a BidMachine Account - How to get Source ID under BidMachine Dashboard.
Enable BidMachine in IronSource SDK Networks Module
-
When you complete your BidMachine setup, Once you have the credentials mentioned above, log in to your IronSource account and go to
Monetize➣Setup➣SDK Networks. -
Select BidMachine from the table of Available Networks and click on the Activate button. Paste all credentials. Then click Save.
-
Select BidMachine from the list of ad networks and click Setup.
-
Activate the relevant ad units.
Add the BidMachine Adapter to Your Build
IronSource SDK supports both Cocoapods and Manual download methods.
To integrate the BidMachine SDK with Cocoapods, add the following lines in your Podfile, run pod install and you’re good to go!
# Bidding adapter
pod 'IronSourceBidMachineAdapter', '~> 4.3.15'

# Waterfall (custom) adapter
pod 'BidMachineIronSourceCustomAdapter', '3.2.1.0'
Note: The SDK requires that you set the iOS deployment target to iOS 13.0 or above and XCode 15.3
Setting up BidMachine Bidding on IronSource mediation
Already running IronSource SDK integration within your application. If you have not done so yet, you can follow the steps in the official IronSource documentation.
Prerequisites
Create an account: please reach out to your account manager to create an account on the BidMachine side.
Setting up BidMachine Waterfall on IronSource mediation
BidMachine custom adapter allows you to use the BidMachine ad platform within your existing IronSource mediation. BidMachine supports banners, MRECs, interstitials, and rewarded videos. It doesn't require any additional code changes.
Create a BidMachine Waterfall Network
-
On the Ironsource platform, select Monetize →Setup→SDK Networks
-
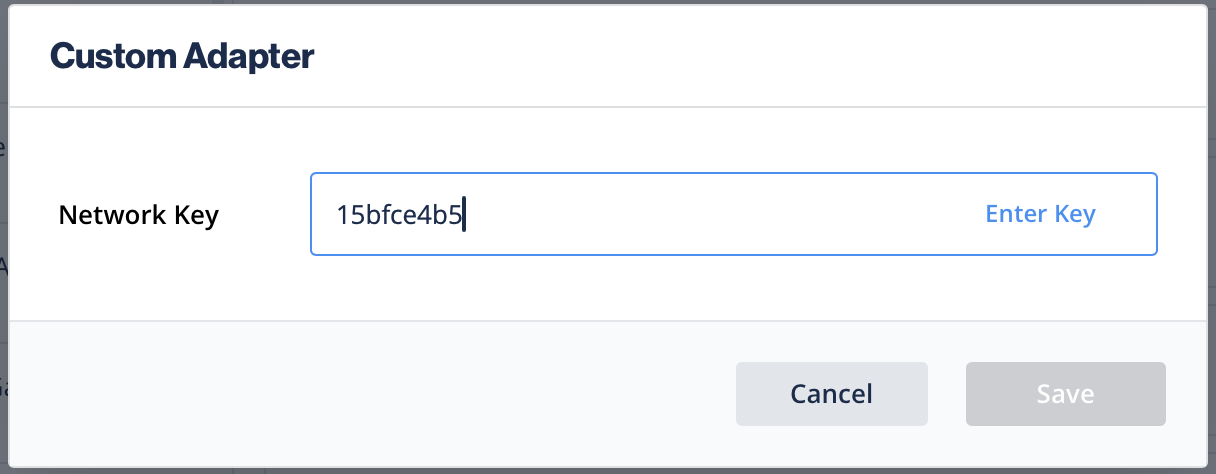
Select Available Networks→ Manage Networks. In the dropdown list of available networks, select “Custom Adapter”
-

To enable the Bidmachine Adapter, input Network Key 15bfce4b5, then click on the Enter key, and save. The name of the network should appear as BidmachineWaterfall.

-
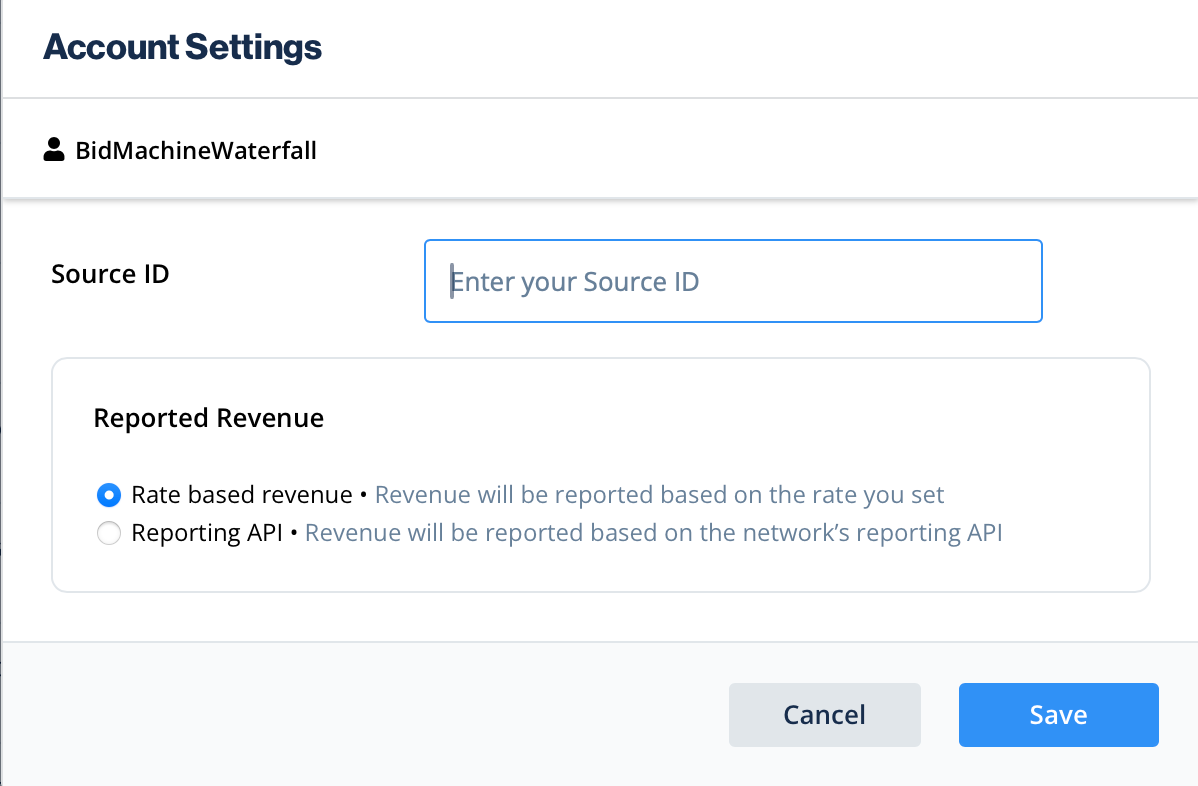
In the next section, enter the Source id provided by Bidmachine, and select “Rate based revenue”

-
Click save, your BidMachine network is now ready
Add Bidmachine to Ironsource waterfalls
-
Access the SDK Networks page
-
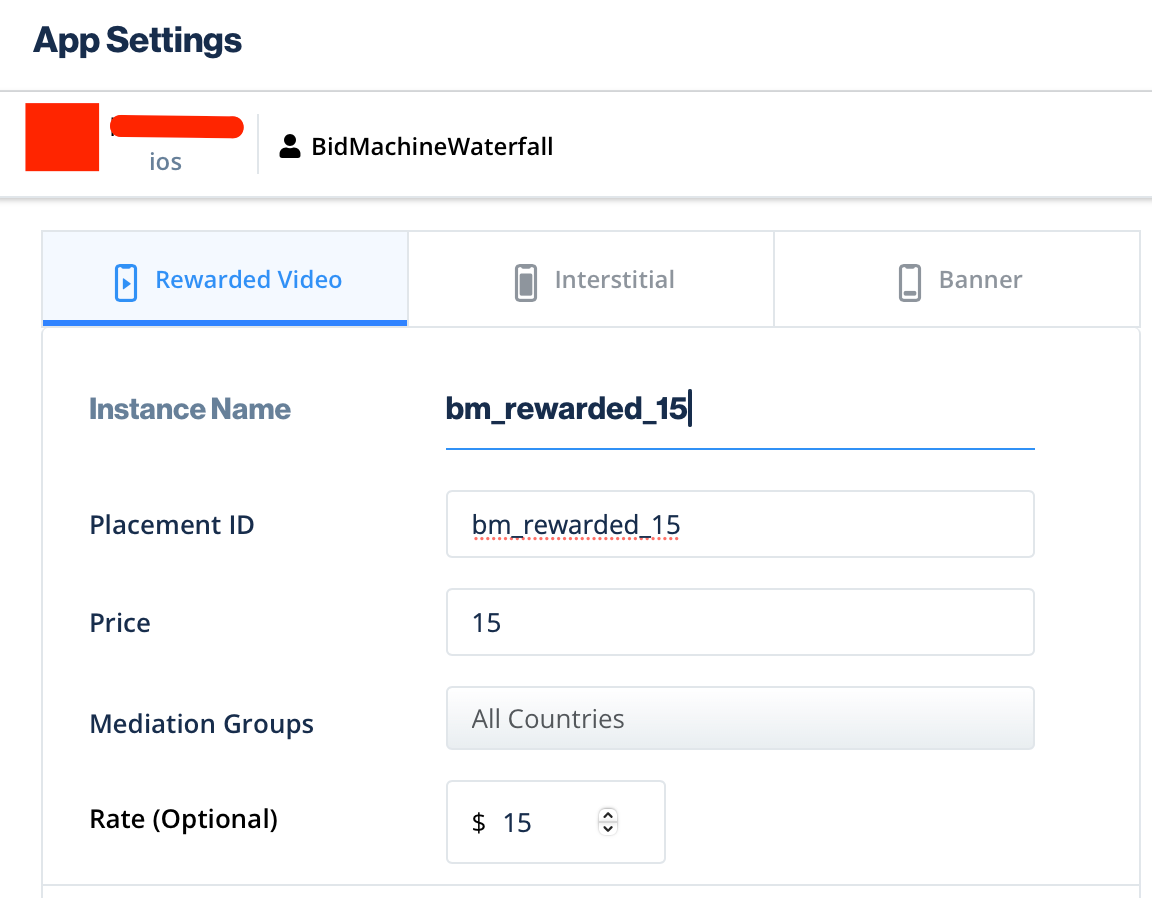
In the custom section, select Bidmachine Waterfall and click on the Setup button
-
Input the Placement id (e.g. bm_rewarded_15)
-
Input the Price
-
Select the targeted Mediation Group
-
Input the Rate
-
Click Save to save the record

Bidmachine supports multiple placements in the waterfall
It is highly recommended to enter the Rate, as this determines the correct order in the waterfalls
BidMachine Additional Settings
User-level COPPA
Unity LevelPlay lets publishers communicate BidMachine User-level COPPA settings directly to the BidMachine network. This feature is enabled using ironSource SDK 7.4.0+, and BidMachine iOS Bidding Adapter 4.3.0+.
Use the following syntax, to set BidMachine COPPA with the parameter True:
IronSource.setMetaDataWithKey("BidMachine_COPPA", value: "Yes")[IronSource setMetaDataWithKey:@"BidMachine_COPPA" value:@"Yes"];Use the following syntax, to set BidMachine COPPA with the parameter False:
IronSource.setMetaDataWithKey("BidMachine_COPPA", value: "No")[IronSource setMetaDataWithKey:@"BidMachine_COPPA" value:@"No"];Regulations
In order to comply with GDPR, CCPA, and COPPA, you will need to set the below flags in the Bidmachine adapter. This is best done before initializing the IronSource network.
- GDPR aka userConsent (Requirement for EU)
- COPPA aka ageRestrictedUser (age-restricted user, such as users under the age of 13)
- CCPA aka doNotSell (California Consumer Privacy Laws)
import BidMachine

BidMachineSdk.shared.regulationInfo.populate { regulationInfo in
    regulationInfo.withCOPPA(true)
    regulationInfo.withGDPRZone(true)
    regulationInfo.withGDPRConsent(true)
    regulationInfo.withGDPRConsentString("")
    regulationInfo.withUSPrivacyString("")
    regulationInfo.withGPP("", [])
}
#import <BidMachine/BidMachine-Swift.h>
[BidMachineSdk.shared.regulationInfo populate:^(id<BidMachineRegulationInfoBuilderProtocol> regulationInfo) {
[regulationInfo withCOPPA:YES];
[regulationInfo withGDPRZone:YES];
[regulationInfo withGDPRConsent: YES];
[regulationInfo withGDPRConsentString:@""];
[regulationInfo withUSPrivacyString:@""];
[regulationInfo withGPP:@"" :@[]];
}];Note: SDK automatically retrieves CCPA string from UserDefaults. If you would like to pass CCPA string according to IAB standards, please add it in UserDefaults. More information here.
Also, SDK automatically retrieves GPP from UserDefaults. If you would like to pass GPP according to IAB standards, please add it in UserDefaults. More information here and here.
Update apps-ads.txt
- Go to BidMachine Dashboard
- Go to app-ads.txt Tab
- Copy the list and append it to your website's apps-ads.txt file
Testing instructions
Before deploying the Bidmachine SDK and adapter to your live application, you can perform testing with the test mode. This will guarantee a high fill rate (99.99%) during the integration testing process, ensuring that the implementation is functioning correctly. It is crucial to disable the test mode before going live, as failing to do so will result in financial loss.
Revenue Reports
You will be provided with a dashboard, please contact your account manager who will share the credentials with you.
Updated 3 months ago